Your IP...


Wednesday, August 25, 2010

Recover Ubuntu After you install Windows.....

This is just guide what I did for the recover my Ubuntu after install Windows in my HD as dual boot. I know this is a most common problem after you install Windows.

I did this process for Ubuntu 9.10 which is grub version 2. Previous grub versions recovery options are different.

1. Use your Ubuntu 9.10 Live (Installation media) CD/DVD and boot your system.

2. Then get the gnome-terminal and type following

$ sudo fdisk -l

This will give your current partition information in your system, for my system,

/dev/sda1 29 8369 66999082+ 83 Linux

/dev/sda2 * 8370 13995 45190845 7 HPFS/NTFS
/dev/sda3 13996 14593 4803435 5 Extended
/dev/sda5 13996 14593 4803403+ 82 Linux swap / Solaris

3. For my system Linux file system is under /dev/sda1

I’m going to mount this partition to under /mnt directory.

$sudo mount /dev/sda1 /mnt
$sudo mount --bind /dev /mnt/dev
$sudo mount --bind /proc /mnt/proc

4. Now do the chroot to our location which we made under /mnt

sudo chroot /mnt

5. As you can see that your $ change to # and you don’t want to use sudo any more for the administrator privileges.

#grub-install /dev/sda

Please note that it should be “sda” (according to your disk)

If there any error message type,

#grub-install --recheck /dev/sda

6. Now exit from the chroot and umount the drivers, and then reboot your system.

#exit
$sudo umount /mnt/dev
$sudo umount /mnt/proc
$sudo umount /mnt
$sudo reboot

7. Now you can see when the system is rebooting it will gives you grub menu. Sometimes even if you select windows system it not booting up and it will gives you some error messages.

From your grub menu select error recovery mode.

Insert your Ubuntu CD/DVD then run grub repair option.

Then reboot your system and then Windows environment and Ubuntu system’s are available for you

Monday, May 31, 2010

Configure Basic SUDO privileges.

sudo allows a permitted user to execute a command as the superuser or another user, as specified in the sudoers file

main configuration file is /etc/sudoers

My Lab
Non root user "test"
password "123456"

cat /etc/passwd |grep test
test:x:503:504::/home/test:/bin/bash

Here I'll enable access to "test" user to use sudo privileges.
You need to edit this file using special command,
1 [root@redhat ~]# visudo

2 Find entry called,
## Allow root to run any commands anywhere
root ALL=(ALL) ALL

After the root entry put your user name here, Like this
test redhat=(ALL) ALL

Save and quit.

Note :- redhat mean your hostname

Note :- You can edit this file using vi (Like "vi /etc/sudoers") But after you edit and if there any misconfiguration it won't show you. But if you use "visudo" then if there any error when you close file it will show you the error.
Example: I put my entry like this "test redhat=(ALL) AL". Then it's will gave me a error message like this,

Warning: undeclared Cmnd_Alias `AL' referenced near line 72

So this is easy to understand where you need to edit file.

OK. now we configured "test" user to sudo privileges.

3 Loggin as a test user
[root@redhat ~]# su test
[test@redhat root]$

Now we try to find out user permission for the /var/log/message log file
[test@redhat root]$ tail /var/log/messages
tail: cannot open `/var/log/messages' for reading: Permission denied

It's says permission denied.

4 Then use sudo privileges and try
[test@redhat root]$ sudo tail /var/log/messages

Its will give you this kind of security warning message.

We trust you have received the usual lecture from the local System
Administrator. It usually boils down to these three things:

#1) Respect the privacy of others.
#2) Think before you type.
#3) With great power comes great responsibility.

Password:

5 Type password for user test. In my case 123456

Then it will show the message log as follows,
May 31 06:34:32 redhat smartd[2321]: smartd has fork()ed into background mode. New PID=2321.
May 31 06:34:32 redhat init: open(/dev/pts/0): No such file or directory
May 31 06:34:33 redhat pcscd: winscard.c:219:SCardConnect() Reader E-Gate 0 0 Not Found
May 31 06:34:33 redhat last message repeated 3 times

Now we already enabled basic sudo privileges to user test

If your not sudo user,
I added user called test2 and test2 is not sudo user.

[test2@redhat root]$ sudo tail /var/log/messages

We trust you have received the usual lecture from the local System
Administrator. It usually boils down to these three things:

#1) Respect the privacy of others.
#2) Think before you type.
#3) With great power comes great responsibility.

Password:
test2 is not in the sudoers file. This incident will be reported.

Even if test2 provide his password it's give error like this and it's says test2 is not include in sudo file.

You can find this incident under /var/log/secure

[root@redhat ~]# tail /var/log/secure

May 31 06:55:39 rhce sudo: test2 : user NOT in sudoers ; TTY=pts/1 ; PWD=/root ; USER=root ; COMMAND=/usr/bin/tail /var/log/messages
May 31 06:56:56 rhce su: pam_unix(su:session): session closed for user test2

As you can see above test2 is not sudo privilege user and this incident already tracked under secure log file.


Monday, May 3, 2010

Linux Terminal Server - Using VNC sessions.


This will describe about setting up VNC server with xinetd. Actually this will work like terminal servers in Windows system.
You can create separate user login's and password for individual users.


Here my setup is configure RedHat 5.4 as a terminal server and using Tightvnc login from windows clients. Even if you have RedHat on the network it's possible.


Here I'm going to create 3 mode of screen resolution.

vnc01 640x480 port 5950
vnc02 800x600 port 5951
vnc03 1024x768 port 5952

Install required software packages,
[root@redhat ~]# yum istall -y xinetd vnc-server vnc

Go to following directory,
[root@redhat ~]# cd /etc/xinetd.d/

Here you need to mention xinetd sample file. You need to create new file name vnc and put following entry

service vnc01
{
disable = yes
protocol = tcp
socket_type = stream
wait = no
user = nobody
server = /usr/bin/Xvnc
server_args = -inetd -query localhost -once -geometry 640x840 -depth 16 securitytypes=none
}

service vnc02
{
disable = yes
protocol = tcp
socket_type = stream
wait = no
user = nobody
server = /usr/bin/Xvnc
server_args = -inetd -query localhost -once -geometry 800x600 -depth 16 securitytypes=none
}

service vnc03

{
disable = yes
protocol = tcp
socket_type = stream
wait = no
user = nobody
server = /usr/bin/Xvnc
server_args = -inetd -query localhost -once -geometry 1024x768 -depth 16 securitytypes=none
}


Save and exit from the vnc file.

[root@redhat xinetd.d]# pwd /etc/xinetd.d
[root@redhat xinetd.d]# grep disable vnc

disable = yes
disable = yes
disable = yes

Here you can see that "disable = yes" .this mean vnc service is not enabled.
So enable vnc under xinetd
[root@redhat xinetd.d]# chkconfig v
nc on
Now we enable the vnc server and now check for the "disable" status in vnc file under /etc/xinetd.d

[root@redhat xinetd.d]# grep disable vnc
disable = no
disable = no
disable = no

Now you can see that "disable = no" mean services are now up and ruining.


Now add the vnc port's to service file. So edit the service file under /etc directory.

[root@redhat ~]# vi /etc/services +
"+" mark mean you cursor will bring you bottom of the file. add following port's to the file.

# vnc access
vnc01 5950/tcp vnc02 5951/tcp vnc03 5952/tcp

Save and exit the service file.

Update the xinetd
[root@redhat ~]# service xinetd restart Stopping xinetd: [ OK ] Starting xinetd: [ OK ]

run "netstat" and check for your port's are open properly.
[root@redhat ~]# netstat -tnlp |grep 59
tcp 0 0 0.0.0.0:5952 0.0.0.0:* LISTEN 17316/xinetd
tcp 0 0 0.0.0.0:5950 0.0.0.0:* LISTEN 17316/xinetd

tcp 0 0 0.0.0.0:5951 0.0.0.0:* LISTEN 17316/xinetd


Enable xdcmp access via GDM, edit the following file, which is under /etc/gdm/custom.conf

[root@redhat ~]# vi /etc/gdm/custom.conf
after the "[xdmcp]" add following with out space
Enable=true
Save and exit.


Now reboot your system.

After it's rebooted check for the user access.
You need to create user account under /etc/passwd.

If your using linux system to access vnc mode type following,
[root@redhat ~]# vncviewer station:5950 &

Station= VNC server IP

NB. If you cannot login check for the iptables. Sometimes if iptables is up it wont allow you to login. or you can allow vnc port through iptalbes firewall.

Here we mentioned port 5950, 5951 and 5952 for the different VGA resolution.

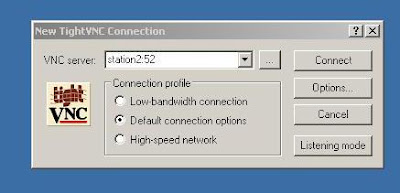
If your using windows system try to access using Tightvnc viwer


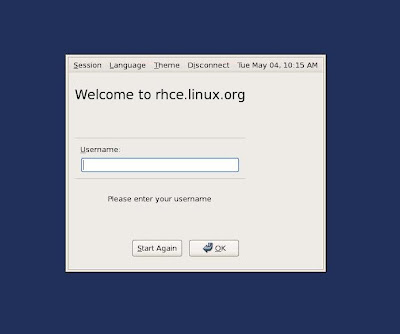
Type you user name and password,


Here is your login.........


  • These are Indipendent terminal sessions like windows terminal server.
  • Advantage is no need any license for this and number of users depend on hardware and server performance.
  • Keep in mind you cannot login as root using this terminal.