Your IP...


Wednesday, August 24, 2011

Linux DRBD + Heartbeat Highavalability

This installation will describe DRBD with Primary and Secondary nodes including virtual IP (Floating IP)
You can find 192.168.1.200

Node1(Primary node)

eth0 192.168.1.201

eth1 10.0.0.201 (For drbd)

Node2 (Secondary node)

eth0 192.168.1.202

eth1 10.0.0.202 (For drbd)

add node details in /etc/hosts file, in both nodes

10.0.0.201 node1

10.0.0.202 node2


Install on both nodes

yum install drbd83 kmod-drbd83 heartbeat heartbeat-devel heartbeat-ldirectord

configure drbd.conf file in /etc on both nodes "data" is resource name. You can put what ever name you prefer. Put this file in both nodes,

global { usage-count no; }

resource data {

protocol C;

startup { wfc-timeout 0; degr-wfc-timeout 120; }

disk { on-io-error detach; } # or panic, ...

net { cram-hmac-alg "sha1"; shared-secret "Cent0Sru!3z"; } # don't forget to choose a secret for auth !

syncer { rate 10M; }

on node1 {

device /dev/drbd0;

disk /dev/sda3;

address 10.0.0.201:7788;

meta-disk internal;

}

on node2 {

device /dev/drbd0;

disk /dev/sda3;

address 10.0.0.202:7788;

meta-disk internal;

}

}

Initialize the meta-data area on disk before starting drbd. Run this command in both nodes.

drbdadm create-md data

Out put will be like this

md_offset 419483648

al_offset 419450880

bm_offset 419434496

Found ext3 filesystem

409601 kB data area apparently used

409604 kB left usable by current configuration

Even though it looks like this would place the new meta data into

unused space, you still need to confirm, as this is only a guess.

Do you want to proceed?

[need to type 'yes' to confirm] yes

Writing meta data...

initializing activity log

NOT initialized bitmap

New drbd meta data block successfully created.

Now you successfully created meta data.

Now stat drbd service in both nodes

service drbd start

Problem and solutions

Sometimes if your /dev/sda... (Your device file) if already mount this cause problem. Please make sure you unmount that device and add comment on /etc/fstab file. Other wise when PC reboot this /dev/sda will check for errors and sometimes PC is not boot up.

Starting DRBD resources: [

data

Found valid meta data in the expected location, 419483648 bytes into /dev/sda3.

d(data) 0: Failure: (114) Lower device is already claimed. This usually means it is mounted.

[data] cmd /sbin/drbdsetup 0 disk /dev/sda3 /dev/sda3 internal --set-defaults --create-device --on-io-error=detach failed - continuing!

s(data) n(data) ].

umount /dev/sda3

Comment your disk resource from /etc/fstab also.

Now try to start drbd service. If it's still gives you errors just reboot the both nodes. After reboot complete try with drbd status

[root@node1 ~]# cat /proc/drbd

version: 8.3.8 (api:88/proto:86-94)

GIT-hash: d78846e52224fd00562f7c225bcc25b2d422321d build by mockbuild@builder10.centos.org, 2010-06-04 08:04:16

0: cs:Connected ro:Secondary/Secondary ds:Inconsistent/Inconsistent C r----

ns:0 nr:0 dw:0 dr:0 al:0 bm:0 lo:0 pe:0 ua:0 ap:0 ep:1 wo:b oos:409604

Type this on primary node that you decide. In this case node1

drbdadm -- --overwrite-data-of-peer primary data

Check for the device sync

watch cat /proc/drbd

Once sync is complete you can mound /dev/drbd0

mkfs.ext3 /dev/drbd0

mke2fs 1.39 (29-May-2006)

warning: 3 blocks unused.

Filesystem label=

OS type: Linux

Block size=1024 (log=0)

Fragment size=1024 (log=0)

102800 inodes, 409601 blocks

20480 blocks (5.00%) reserved for the super user

First data block=1

Maximum filesystem blocks=67633152

50 block groups

8192 blocks per group, 8192 fragments per group

2056 inodes per group

Superblock backups stored on blocks:

8193, 24577, 40961, 57345, 73729, 204801, 221185, 401409

Writing inode tables: done

Creating journal (8192 blocks): done

Writing superblocks and filesystem accounting information: done

This filesystem will be automatically checked every 25 mounts or

180 days, whichever comes first. Use tune2fs -c or -i to override.

mkdir /u

mount /dev/drbd0 /u

You can create test file and check.

for i in {1..5};do dd if=/dev/zero of=/u/file$i bs=1M count=10;done

Now for the node2 configuration you need to umount /u and set disk as secondary in node1

umount /u

drbdadm secondary data

Here you can see now node1 also as Secondary

watch -n 1 cat /proc/drbd

Every 1.0s: cat /proc/drbd Tue Aug 23 11:21:49 2011

version: 8.3.8 (api:88/proto:86-94)

GIT-hash: d78846e52224fd00562f7c225bcc25b2d422321d build by mockbuild@builder10.centos.org, 2010-06-04 08:04:16

0: cs:Connected ro:Secondary/Secondary ds:UpToDate/UpToDate C r----

ns:482866 nr:0 dw:73262 dr:424875 al:60 bm:30 lo:0 pe:0 ua:0 ap:0 ep:1 wo:b oos:0

Now In node2 you can create /u folder and mount dev/drbd0

drbdadm primary data

mkdir /u

mount /dev/drbd0 /u

Delete files that create previously and add new files.

unmount from the node2 and set drbd as secondary

Goto node1 and set that as primary and mount. You can see all the files that we create from node2.

Now drbd is ok

add it to start up on both nodes

chkconfig drbd on

Configure heart beat.

goto node1 and /etc/ha.d

touch ha.cf

Add followings

logfile /var/log/ha-log

logfacility local0

keepalive 2

deadtime 30

initdead 120

bcast eth0

udpport 694

auto_failback on

node node1

node node2

crm no

touch authkeys

Add following

auth 1

1 sha1 MySecret

set permission on authkey

chmod 600 authkeys

touch haresources

In haresources add the Primary node , Floating IP and the services that you need to monitor through heartbeat (here httpd and smb) 192.168.1.200 mean floating IP.

node1 IPaddr::192.168.1.200 drbddisk::data Filesystem::/dev/drbd0::/u::ext3 httpd smb

Stop httpd and smb services in the both nodes. Because heartbeat will start the process and do the fail over part.

chkconfig httpd off

chkconfig smb off

Add heartbeat service to startup in both nodes.

chkconfig heartbeat on

Any issue with split brain ?

When it's come to split brain there are 02 node we can identified.

1. Split brain victim

2. Split brain survivor

Select on of your node and type,

drbdadm secondary data <----------------------------- Now this node act as victim

This issue can be solved,

1. To perform command this way to pass this option directly to drbdsetup: (EASY WAY) Select one node and set it as secondary.

drbdadm secondary data

drbdadm -- --discard-my-data connect data

Now go to other node (Split brain survivor) and type

drbdadm connect data

Now check on both node and it become normal status


Resources

http://wiki.centos.org/HowTos/Ha-Drbd

http://www.drbd.org/users-guide/ch-rhcs.html

http://supportex.net/2011/07/drbd-split-brain-solution-primaryprimary-setup/

http://almamunbd.wordpress.com/2009/05/28/how-to-configure-mysql-high-availability-with-drbd-and-heartbeat/


Saturday, July 23, 2011

Cacti-0.8.7g installation on Fedora 15 x64

Cacti installation on Fedora 15 x64

1. Install required packages for cacti.


yum -y install httpd php mysql mysql-server php-mysql rrdtool net-snmp* cacti


2. After install packages start mysqld andset up password for your mysqladmin. Here I have mentioned that as admin123

/etc/init.d/mysqld start

Add mysql service to start up

chkconfig mysqld on

mysqladmin -u root password


Start httpd too.......
/etc/init.d/httpd start
chkconfig httpd on


3. Login to mysql
mysql -u root -p

4. Create database for cacti
create database cacti;
grant all on cacti.* to root;
grant all on cacti.* to root@localhost;
grant all on cacti.* to cacti;
grant all on cacti.* to cacti@loc
alhost;
set password for
cacti@localhost=password('cacti123');
quit;

5. Open /etc/cacti/db.php set as followings,
$database_type = "mysql";

$database_default = "cacti";
$database_hostname = "localhost";
$database_username = "cacti";
$database_password = "cacti123";
$database_port = "3306";


6. Now go to /usr/share/doc/cacti-0.8.7g
You can see cacti.sql database available


when you try to upload this cacti.sql to cacti database it will submit following error,

ERROR 1064 (42000) at line 5: You have an error in your SQL syntax; check the manual that corresponds to your MySQL server version for the right syntax to use near 'TYPE=MyISAM' at line 6


Fedora 15 mysql default database engine work as InnoDB instead of MyISAM.

So using vim / vi you need to edit cacti.sql and replace 'TYPE' with 'ENGINE'
Use sed command to do this for you............ and save
your time...


sed -i -e 's/TYPE=/ENGINE=/g' /usr/share/doc/cacti-0.8.7g/cacti.sql


Thanks to fabian-affolter.ch for sed magic.............. :)


Now upload cacti.sql to your cacti database


mysql -u root -p cacti < cacti.sql


7. Go to /etc/httpd/conf.d and edit cacti.conf and allow for access


Alias /cacti /usr/share/cacti

Order Deny,Allow
Allow from all


You can check the syntaxt after edit file using
httpd -t

Syntax OK


8. Text based part is over :) and can start with graphical i
nstallation.
Go you your browser and type http://xxx.xxx.xxx.xxx/cacti


Click NEXT


Click NEXT


Verify all the necessary packages show properly with out error. Then click FINISH


It will prompt you login screen and put default user name and password as
admin
Click on LOGIN


This will force you to change the password. Change it to own password and click SAVE


Now you can see your cacti installation. You can move on with adding cacti graphs.....

Add following cronjob to collect data for cacti

crontab -e

*/5 * * * * root /usr/bin/php /usr/share/cacti/poller.php > /dev/null 2>&1


This poller.php will run every 5 min and collect data for cacti.

Wednesday, August 25, 2010

Recover Ubuntu After you install Windows.....

This is just guide what I did for the recover my Ubuntu after install Windows in my HD as dual boot. I know this is a most common problem after you install Windows.

I did this process for Ubuntu 9.10 which is grub version 2. Previous grub versions recovery options are different.

1. Use your Ubuntu 9.10 Live (Installation media) CD/DVD and boot your system.

2. Then get the gnome-terminal and type following

$ sudo fdisk -l

This will give your current partition information in your system, for my system,

/dev/sda1 29 8369 66999082+ 83 Linux

/dev/sda2 * 8370 13995 45190845 7 HPFS/NTFS
/dev/sda3 13996 14593 4803435 5 Extended
/dev/sda5 13996 14593 4803403+ 82 Linux swap / Solaris

3. For my system Linux file system is under /dev/sda1

I’m going to mount this partition to under /mnt directory.

$sudo mount /dev/sda1 /mnt
$sudo mount --bind /dev /mnt/dev
$sudo mount --bind /proc /mnt/proc

4. Now do the chroot to our location which we made under /mnt

sudo chroot /mnt

5. As you can see that your $ change to # and you don’t want to use sudo any more for the administrator privileges.

#grub-install /dev/sda

Please note that it should be “sda” (according to your disk)

If there any error message type,

#grub-install --recheck /dev/sda

6. Now exit from the chroot and umount the drivers, and then reboot your system.

#exit
$sudo umount /mnt/dev
$sudo umount /mnt/proc
$sudo umount /mnt
$sudo reboot

7. Now you can see when the system is rebooting it will gives you grub menu. Sometimes even if you select windows system it not booting up and it will gives you some error messages.

From your grub menu select error recovery mode.

Insert your Ubuntu CD/DVD then run grub repair option.

Then reboot your system and then Windows environment and Ubuntu system’s are available for you

Monday, May 31, 2010

Configure Basic SUDO privileges.

sudo allows a permitted user to execute a command as the superuser or another user, as specified in the sudoers file

main configuration file is /etc/sudoers

My Lab
Non root user "test"
password "123456"

cat /etc/passwd |grep test
test:x:503:504::/home/test:/bin/bash

Here I'll enable access to "test" user to use sudo privileges.
You need to edit this file using special command,
1 [root@redhat ~]# visudo

2 Find entry called,
## Allow root to run any commands anywhere
root ALL=(ALL) ALL

After the root entry put your user name here, Like this
test redhat=(ALL) ALL

Save and quit.

Note :- redhat mean your hostname

Note :- You can edit this file using vi (Like "vi /etc/sudoers") But after you edit and if there any misconfiguration it won't show you. But if you use "visudo" then if there any error when you close file it will show you the error.
Example: I put my entry like this "test redhat=(ALL) AL". Then it's will gave me a error message like this,

Warning: undeclared Cmnd_Alias `AL' referenced near line 72

So this is easy to understand where you need to edit file.

OK. now we configured "test" user to sudo privileges.

3 Loggin as a test user
[root@redhat ~]# su test
[test@redhat root]$

Now we try to find out user permission for the /var/log/message log file
[test@redhat root]$ tail /var/log/messages
tail: cannot open `/var/log/messages' for reading: Permission denied

It's says permission denied.

4 Then use sudo privileges and try
[test@redhat root]$ sudo tail /var/log/messages

Its will give you this kind of security warning message.

We trust you have received the usual lecture from the local System
Administrator. It usually boils down to these three things:

#1) Respect the privacy of others.
#2) Think before you type.
#3) With great power comes great responsibility.

Password:

5 Type password for user test. In my case 123456

Then it will show the message log as follows,
May 31 06:34:32 redhat smartd[2321]: smartd has fork()ed into background mode. New PID=2321.
May 31 06:34:32 redhat init: open(/dev/pts/0): No such file or directory
May 31 06:34:33 redhat pcscd: winscard.c:219:SCardConnect() Reader E-Gate 0 0 Not Found
May 31 06:34:33 redhat last message repeated 3 times

Now we already enabled basic sudo privileges to user test

If your not sudo user,
I added user called test2 and test2 is not sudo user.

[test2@redhat root]$ sudo tail /var/log/messages

We trust you have received the usual lecture from the local System
Administrator. It usually boils down to these three things:

#1) Respect the privacy of others.
#2) Think before you type.
#3) With great power comes great responsibility.

Password:
test2 is not in the sudoers file. This incident will be reported.

Even if test2 provide his password it's give error like this and it's says test2 is not include in sudo file.

You can find this incident under /var/log/secure

[root@redhat ~]# tail /var/log/secure

May 31 06:55:39 rhce sudo: test2 : user NOT in sudoers ; TTY=pts/1 ; PWD=/root ; USER=root ; COMMAND=/usr/bin/tail /var/log/messages
May 31 06:56:56 rhce su: pam_unix(su:session): session closed for user test2

As you can see above test2 is not sudo privilege user and this incident already tracked under secure log file.


Monday, May 3, 2010

Linux Terminal Server - Using VNC sessions.


This will describe about setting up VNC server with xinetd. Actually this will work like terminal servers in Windows system.
You can create separate user login's and password for individual users.


Here my setup is configure RedHat 5.4 as a terminal server and using Tightvnc login from windows clients. Even if you have RedHat on the network it's possible.


Here I'm going to create 3 mode of screen resolution.

vnc01 640x480 port 5950
vnc02 800x600 port 5951
vnc03 1024x768 port 5952

Install required software packages,
[root@redhat ~]# yum istall -y xinetd vnc-server vnc

Go to following directory,
[root@redhat ~]# cd /etc/xinetd.d/

Here you need to mention xinetd sample file. You need to create new file name vnc and put following entry

service vnc01
{
disable = yes
protocol = tcp
socket_type = stream
wait = no
user = nobody
server = /usr/bin/Xvnc
server_args = -inetd -query localhost -once -geometry 640x840 -depth 16 securitytypes=none
}

service vnc02
{
disable = yes
protocol = tcp
socket_type = stream
wait = no
user = nobody
server = /usr/bin/Xvnc
server_args = -inetd -query localhost -once -geometry 800x600 -depth 16 securitytypes=none
}

service vnc03

{
disable = yes
protocol = tcp
socket_type = stream
wait = no
user = nobody
server = /usr/bin/Xvnc
server_args = -inetd -query localhost -once -geometry 1024x768 -depth 16 securitytypes=none
}


Save and exit from the vnc file.

[root@redhat xinetd.d]# pwd /etc/xinetd.d
[root@redhat xinetd.d]# grep disable vnc

disable = yes
disable = yes
disable = yes

Here you can see that "disable = yes" .this mean vnc service is not enabled.
So enable vnc under xinetd
[root@redhat xinetd.d]# chkconfig v
nc on
Now we enable the vnc server and now check for the "disable" status in vnc file under /etc/xinetd.d

[root@redhat xinetd.d]# grep disable vnc
disable = no
disable = no
disable = no

Now you can see that "disable = no" mean services are now up and ruining.


Now add the vnc port's to service file. So edit the service file under /etc directory.

[root@redhat ~]# vi /etc/services +
"+" mark mean you cursor will bring you bottom of the file. add following port's to the file.

# vnc access
vnc01 5950/tcp vnc02 5951/tcp vnc03 5952/tcp

Save and exit the service file.

Update the xinetd
[root@redhat ~]# service xinetd restart Stopping xinetd: [ OK ] Starting xinetd: [ OK ]

run "netstat" and check for your port's are open properly.
[root@redhat ~]# netstat -tnlp |grep 59
tcp 0 0 0.0.0.0:5952 0.0.0.0:* LISTEN 17316/xinetd
tcp 0 0 0.0.0.0:5950 0.0.0.0:* LISTEN 17316/xinetd

tcp 0 0 0.0.0.0:5951 0.0.0.0:* LISTEN 17316/xinetd


Enable xdcmp access via GDM, edit the following file, which is under /etc/gdm/custom.conf

[root@redhat ~]# vi /etc/gdm/custom.conf
after the "[xdmcp]" add following with out space
Enable=true
Save and exit.


Now reboot your system.

After it's rebooted check for the user access.
You need to create user account under /etc/passwd.

If your using linux system to access vnc mode type following,
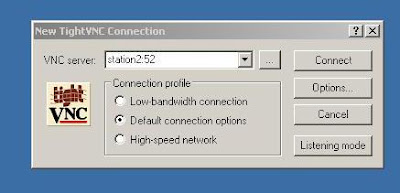
[root@redhat ~]# vncviewer station:5950 &

Station= VNC server IP

NB. If you cannot login check for the iptables. Sometimes if iptables is up it wont allow you to login. or you can allow vnc port through iptalbes firewall.

Here we mentioned port 5950, 5951 and 5952 for the different VGA resolution.

If your using windows system try to access using Tightvnc viwer


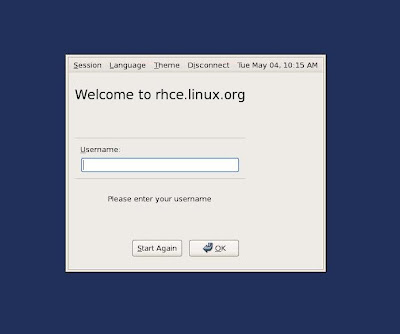
Type you user name and password,


Here is your login.........


  • These are Indipendent terminal sessions like windows terminal server.
  • Advantage is no need any license for this and number of users depend on hardware and server performance.
  • Keep in mind you cannot login as root using this terminal.

Monday, November 30, 2009

GLPI best open soruce inventory management system.

This is introduced by glpi-project.org

Here I would like to submit the way I installed this in Cent OS 5.2

For the "glpi" installation you need following services on your server,
  1. Apache (httpd)
  2. Mysql (mysqld)
  3. PHP (php)
After installation your cent os check for the following rpm are available in your system.

[root@inv ~]# rpm -qa |grep httpd

[root@inv ~]# rpm -qa |grep php

[root@inv ~]# rpm -qa |grep mysql-server


my idea is better after fresh installation you can set "yum" for above rpm's

Install using yum update services,

[root@inv ~]# yum -y install httpd php mysql

After yum installation check your rpm's available. it will show like this,

[root@inv ~]# rpm -qa |grep mysql-server
mysql-server-5.0.45-7.el5


[root@inv ~]# rpm -qa |grep php
php-pecl-json-1.2.1-4.el5
php-cli-5.1.6-23.2.el5_3
php-5.1.6-23.2.el5_3
php-pear-1.4.9-4.el5.1
php-pdo-5.1.6-23.2.el5_3
php-pgsql-5.1.6-23.2.el5_3
php-odbc-5.1.6-23.2.el5_3
php-mysql-5.1.6-23.2.el5_3
php-common-5.1.6-23.2.el5_3
php-ldap-5.1.6-23.2.el5_3

[root@inv ~]# rpm -qa |grep httpd
httpd-2.2.3-11.el5_1.centos.3

OK. now our Initial installation is Done.. Now we need to down load glpi latest version from glpi-project.org web site.
By default this site language is not English. so you need to select the top of page language as English.

go to Download page and better always download latest stable version.
chagne your path to,
[root@inv ~]# cd /usr/src/

then,

[root@inv src]# wget http://www.glpi-project.org/IMG/gz/glpi-0.72.3.tar.gz

OK. now we downloaded "glpi-0.72.3.tar.gz" successfully.

now untar the file,

[root@inv src]# tar -zxvf glpi-0.72.3.tar.gz

After it will create a directory called "glpi"

Now copy glpi directory to /var/www/html directory for installation.

[root@inv src]# cp -Rp glpi /var/www/html/

Now we copy glpi to /var/www/html directory.

Now create a data base for glpi in mysql.

Before create data bese in mysql start mysql service,and add to startup

[root@inv src]# /etc/init.d/mysqld start
[root@inv src]# chkconfig mysqld on

Create mysql admin password,

[root@inv src]# mysqladmin -u root password 'abc123'

Note : Here abc123 mean my password for mysql admin. you can use password as your wish.
Then log in to mysql,
[root@inv src]# mysql -u root -p

This will ask your password, in my case abc123
After you put correct password prompt will change to follows,

[root@inv src]# mysql -u root -p
Enter password:
Welcome to the MySQL monitor. Commands end with ; or \g.
Your MySQL connection id is 19
Server version: 5.0.45 Source distribution

Type 'help;' or '\h' for help. Type '\c' to clear the buffer.

mysql>

Now create a data base for glpi

mysql> create database glpidb;
mysql> grant all privileges on glpidb.* to glpiuser@localhost identified by 'glpi';

gives the good rights to the user « glpiuser » on tables of the « glpidb » database. In this example, « glpi » is the password given to the user « glpiuser

Then exit from the mysql
mysql> quit

Ok now we done for data base creation for glpi. now we can continue with installation,
go to,
[root@inv html]# cd /var/www/html/

you can see there is a directory called glpi is there. which we copied previously.

now we give apache user to access for the glpi directory.

[root@inv html]# chown -R apache glpi/
[root@inv html]# chmod 755 glpi/

you can check the right like this,

[root@inv html]# ll
drwxr-xr-x 14 apache root 4096 Oct 27 22:48 glpi

Ok. now start the httpd and add to startup services,

[root@inv html]# /etc/init.d/httpd start
[root@inv html]# chkconfig httpd on


Now go to web browser and type your server ip and continue with installtion,
my case,

http://192.168.100.200/glpi

Sometimes when you try to access through the web browser it wont show the web site. Most of the time this is due to iptables.
So if its like that switch off the iptables

[root@inv html]# /etc/init.d/iptables stop

It will show you glpi installation wizard and language selection,


Click OK to next ...
Accept for the License agreement and click CONTINUE,

Click on Installation Button to continue,

Note: Sometimes in this step you may face problem with Test json fuctions" FAIL. Practically I had this issue and I fixed it using some rpm.
If your "Test json function" fails go to follwing rpm repositary.... and down load php-pecl-json-1.2.1-4.el5.i386.rpm

After download install with no dependency Option.

[root@inv src]# rpm -Uvh --nodeps php-pecl-json-1.2.1-4.el5.i386.rpm

Then restart the server and run the web interface installation again.

OK. If everything are ok we can continue with click on Continue button.
Now it will ask for the data base connection type,
fill the connection type as,
Remember mysql password is "abc123"
Click continue,
Select the data base which we created glpidb and click Continue,

This will Initialized data base connection. Then Click Continue Button,

OK. Now this will show you glpi default username and password for the loggin.
Default logins / passwords are:

glpi/glpi for the administrator account
tech/tech for the technician account
normal for the normal account
post-only/post-only for the postonly account

Click Use GLPI button to Continue,

OK. Now we have successfully installed glpi. now you can login to system first time using default user name and password which is glpi

After you log in to glpi it will like this,


Now you can continue with further customization......
Future I would like to post how to customization interface and file in glpi.

Refer Documents